Intraosseous Infusion - Humeral Head: Difference between revisions
From Protocopedia
No edit summary |
No edit summary |
||
| Line 67: | Line 67: | ||
====VIDEOS==== | ====VIDEOS==== | ||
Arrow® EZ-IO® Insertion Site Identification - Proximal Humerus | |||
Arrow® EZ-IO® Proximal Humerus Insertion | |||
[[Category:Procedure Guidelines]] | [[Category:Procedure Guidelines]] | ||
Revision as of 21:48, 5 January 2017
Procedure Guidelines
9.14.2 INTRAOSSEOUS INFUSION - HUMERAL HEAD
The MFRD Medical Director has approved the EZ IO device for Intraosseous (IO) access:
INDICATIONS:
- Immediate vascular access in emergencies.
- Intravenous fluids or medications are urgently needed and a peripheral IV cannot be established in 2 attempts or 90 seconds AND the patient exhibits one or more of the following:
- An altered mental status (GCS of 8 or less)
- Respiratory compromise (SaO2 90% after appropriate oxygen therapy, respiratory rate < 10 or > 40 min)
- Hemodynamic instability (Systolic BP of < 90).
- Cardiac arrest (medical or traumatic)
- Profound hypovolemia with alteration of mental status
- Burns blocking peripheral IV sites
CONTRAINDICATIONS: (If a contraindication is present evaluate the opposite arm for placement.)
- Fracture to the humerus.
- An extremity that is compromised by a pre-existing medical condition. (Example – tumor or peripheral vascular disease)
- Any infection or burn* over the insertion site.
- Excessive tissue at insertion site with the absence of anatomical landmarks (consider alternate site)
- Relative contraindication. If patient has extensive burns, the site can be used if unable to obtain an IV.
PROCEDURE: EZ IO
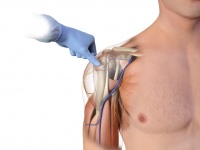
- Identify the proximal humerus: Place the patient’s hand over the abdomen (elbow adducted and humerus internally rotated)

- Place your palm on the patient’s shoulder anteriorly
- The area that feels like a “ball” under your palm is the general target area
- You should be able to feel this ball, even on obese patients, by pushing deeply

- Place the ulnar aspect of one hand vertically over the axilla
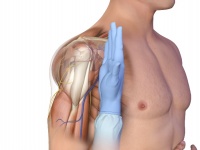
- Place the ulnar aspect of the opposite hand along the midline of the upper arm laterally.
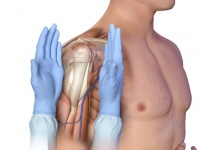
- Place your thumbs together over the arm.
- This identifies the vertical line of insertion on the proximal humerus
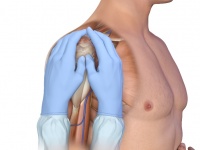
- Palpate deeply as you climb up the humerus to the surgical neck.
- It will feel like a golf ball on a tee – the spot where the “ball” meets the “tee” is the surgical neck
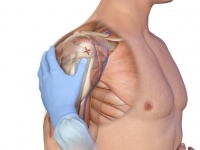
- The insertion site is on the most prominent aspect of the greater tubercle, 1 to 2 cm above the surgical neck
- Insertion:
- Prepare the site by using antiseptic solution of your choice
- Use a clean, “no touch” technique
- Remove the needle cap
- Point the needle set tip at a 45-degree angle to the anterior plane and posteromedial
- Push the needle tip through the skin until the tip rests against the bone
- The 5mm mark must be visible above the skin for confirmation of adequate needle length
- Gently drill into the humerus 2cm or until the hub reaches the skin in an adult.
- The hub of the needle set should be perpendicular to the skin
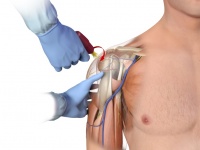
- Hold the hub in place and pull the driver straight off
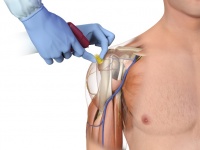
- Continue to hold the hub while twisting the stylet off the hub with counter clockwise rotations
- The needle should feel firmly seated in the bone (1st confirmation of placement)
- Place the stylet in a sharps container
- Place the EZ-StabilizerTM dressing over the hub
- Connect primed EZ-Connect®. Slowly administer appropriate dose of Lidocaine 2% (Preservative Free) IO to conscious patients. Syringe bolus (flush) the EZ-IO® catheter with the appropriate amount of normal saline.
- 20-40mg for adult patients
- > 0.5mg / kg for pediatric patients
- Utilize pressure (syringe bolus, pressure bag or infusion pump) for continuous infusions where applicable. Begin infusion. Dress site, secure tubing and apply wristband as directed. Monitor EZ-IO® site and patient condition – Remove catheter within 24 hours.
- Pull the tabs off the EZ-Stabilizer dressing to expose the adhesive, apply to the skin
- Aspirate for blood/bone marrow (2nd confirmation of placement)
- Secure the arm in place across the abdomen
VIDEOS
Arrow® EZ-IO® Insertion Site Identification - Proximal Humerus
Arrow® EZ-IO® Proximal Humerus Insertion
